| |
|
Introduction
The idea
Results
Three-motors-problem
LabView programming
Mechanics
All Mindstorms projects
Jörg Roth's Homepage
 email email
Impressum
Datenschutzerklärung
Privacy Policy
 This page
in German
|
| |
R2D2, Marvin, Data, T101 or Twiki –
there is a certain point when a Mindstorms NXT fan wants to build a movie robot.
For me, the choice was easy: I want to build a small version of the robot Johnny (number) 5 from the movie "Short Circuit".
With some background of former NXT projects, I set the following goals:
- This model should be a combination of mock-up and functioning model: it should look like the original robot in the movie and, on the other hand, should execute a number of simple tasks.
- It should combine Lego technics parts with the traditional Lego bricks.
- Finally, I want to discover the limitations of the LabView software development method, the potentials of the NXT approach and the mechanical restrictions of Lego construction.
In the following, I want to present some experiences with the project.
|
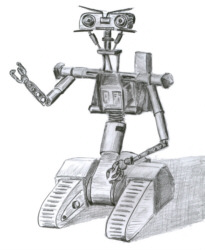 | "Original" Johnny 5 |
|
In the movie Johnny 5 was a military robot which can be made out by the track chains useful in rough terrain.
To build the chains, additional parts were necessary as the NXT kit does not contain any chain elements.
Fortunately, I had access to 30 year old parts of my childhood that contain a set of chains.
Consequently, the first modules of Johnny 5 were the track chain drives, with which Johnny should drive forward,
backward, turn at the current location and drive curves. Moreover it should drive over small obstacles.
In addition to driving commands, Johnny 5 should execute commands that explore the environment with the help of sensors. For this, the head should contain the ultrasonic sensor (an obvious choice).
In addition, one arm should contain the tactile sensor, the other the light sensor. The sound sensor was not used (personally, I consider the sound sensor as the most unnecessary part in the NXT kit).
To make measurements with the arm sensors, the respective arm should be moved forward.
The head should be able to turn to different directions in order to measure distances with different angles.
All functions (i.e. motion and measurement) should be modelled using a block library with the following blocks:
- Drive forward to the first obstacle; log the driving distance
- Drive forward x cm or to the first obstacle; log the driving distance
- Turn by +/-x degrees at the current location
- Turn the head to front/right/left; log the measured distances
- Bring a sensor arm to front; perform the respective sensor measurement
Additions blocks to initialize and finalize the runtime environment were required.
With all blocks, a developer should simply develop even complex programs, such as exploring the environment.
|
|
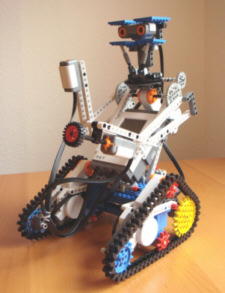 | Johnny 5 |
|
After some improvements, Johnny 5 looks as follows:
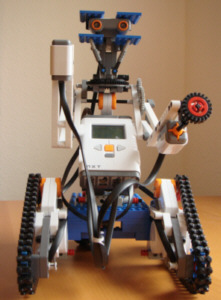 | Johnny 5 (front view) |
|
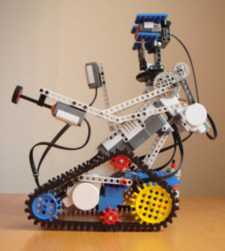 | Johnny 5 (side view) |
|
The following problems concerning assembly and programming have to be solved:
-
Developing with LabView: I discovered certain limitations concerning the overall concept and stability.
I expect the LabView environment becomes more and more stable over time, however the conceptual limits will persist
(more see below).
-
According to the actual idea the robot should build its own environment map. I quickly discovered that this was a far too ambitious task for the NXT runtime system.
A second approach was that Johnny sends the sensor information by Bluetooth to a PC that builds a map.
Due to a Bluetooth incompatibility between NXT and my PC (that was proved to be a problem of NXT)
this plan could also not be realized.
Instead, the sensor information will now be logged to a file in the NXT brick that can be uploaded to the PC via USB.
- The limitation of three motors per NXT brick is very irritating (more see below).
- Some problems were related to the mechanical assembly. Especially the chain tracks lead to a problem:
Whereas the real Johnny 5 had chains that can easily move crosswise, my chain elements stick at the ground in any direction. Rotating thus leads to mechanical stress. I could reduce this stress with the help of an additional cog, but it was not possible to drive over obstacles any more.
For most of the problems above I discovered work arounds. I come back to some major problems later.
As a next step, I want to present some sample applications.
Run and probe
This first simple program lets Johnny 5 drive to the next obstacle. Then it uses its arms to measure light intensity and
tests, whether the obstacle is massive.
 | Program: Run_and_probe |
|
|
|
The resulting log file:
Light density/lamp on: 27
Light density/lamp off: 26
Tactile/currentPos: free
Tactile/7cm ahead: pressed
|
Turn and run
The next program illustrates motion commands. The task is to turn at the location, drive a certain distance and then turns again.
 | Program: Turn_and_run |
|
|
|
The resulting log file:
Turned Right [deg]: 90
Moved forward [cm]:20
Turned Left [deg]: 90
|
Exploring the environment
This program was the final operating program of Johnny 5. The task is to drive in an environment for a certain time.
Periodically, it measures distances to all obstacles. The sensor log can be transmitted to a PC afterwards that builds a map.
 | Program: Exploration |
The resulting log file:
Moved forward [cm]:53
Ultrasonic distance/looking front [cm]:  71
Ultrasonic distance/looking left [cm]:  255
Ultrasonic distance/looking right [cm]:  62
Turned Right [deg]: 45
Moved forward [cm]:30
Ultrasonic distance/looking front [cm]:  37
Ultrasonic distance/looking left [cm]:  49
Ultrasonic distance/looking right [cm]:  37
Turned Right [deg]: 45
Moved forward [cm]:1
Ultrasonic distance/looking front [cm]:  36
Ultrasonic distance/looking left [cm]:  36
Ultrasonic distance/looking right [cm]:  118
Turned Right [deg]: 45
Moved forward [cm]:53
Ultrasonic distance/looking front [cm]:  57
Ultrasonic distance/looking left [cm]:  25
Ultrasonic distance/looking right [cm]:  255
Turned Right [deg]: 45
Moved forward [cm]:52
Ultrasonic distance/looking front [cm]:  255
Ultrasonic distance/looking left [cm]:  21
Ultrasonic distance/looking right [cm]:  255
Turned Right [deg]: 45
Moved forward [cm]:16
Ultrasonic distance/looking front [cm]:  255
Ultrasonic distance/looking left [cm]:  255
Ultrasonic distance/looking right [cm]:  145
Turned Right [deg]: 45
Moved forward [cm]:52
Ultrasonic distance/looking front [cm]:  89
Ultrasonic distance/looking left [cm]:  40
Ultrasonic distance/looking right [cm]:  255
Turned Right [deg]: 45
|
|
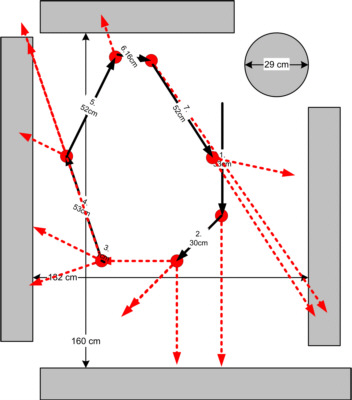 | A map built with the sensor logs |
|
The first challenge was due to a NXT limitation, I could not understand: NXT can only drive three motors.
Even though additional motors can be purchased, the NXT brick has only three output connectors for motors.
A reason for this limitation could be to save space on the brick's surface. To solve this, Lego either should have been omitted
the sound sensor or should have used a bus-like systems to connect both motors and sensors. With this also the sometimes
complicated centralized cabling could be avoided.
However, I wanted to realize more functions than three motors could provide.
Two motors are required to drive in different directions, thus for the sensor applications only one motor was available.
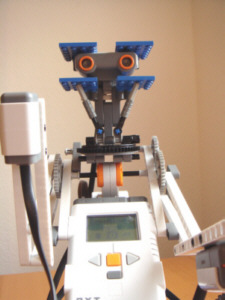 | The upper part |
|
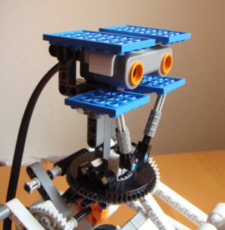 | The head |
|
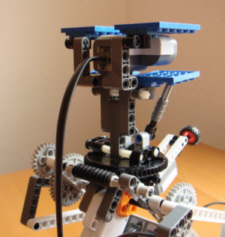 | The head (back view) |
|
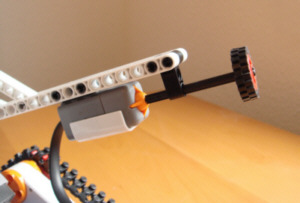 | The tactile sensor |
|
An unsatisfactory solution of the problem was to couple arms and head motion. As a result, independent
movement of head and arms was not possible. Some details:
- Turning the arm motor by 180 degrees changes the front arm. The head moves slightly, which can be ignored.
- Turning the arm motor by n*360 degrees moves the arms, but afterwards the arm positions are identical to the initial positions, but the head has turned to left or right.
Turning by n*360+m*180 (n out of {0...7}, m out of {0,1}) we can configure any desired arm and head position. The disadvantage: turning the head requires moving of the arms. For extensive head usage (such as in the exploration tasks) this is distracting. Thus, there was the possibility to mechanically fix the arms if they are not used.
The second challenge was software development with LabView.
With a background of some million lines of code (imperative and object oriented), I thought it should not be too hard
to create a program with LabView...
Unfortenately, developing software with LabView is a kind of nightmare. The reasons:
- Programming according to the data flow model has certain limitations.
- The LabView environment for NXT was considerably unstable.
- Some important features of the original LabView environment were removed for NXT.
The LabView environment follows the principle: Simple tasks are simple, complex tasks are impossible.
I assume, the major goal was to simplify software development for inexperienced developers.
Experiences with Johnny 5 showed that even though more complex programs can be developed,
demanding tasks such as building an environment map cannot be implemented. This is a result of
the state model behind the dataflow runtime system. In LabView an output value (e.g. a sensor value) is directly connected to an input of another block (e.g. to control motor speed).
There exist additional blocks that transform values (e.g. multiply with a number), thus even complex
transformation between output and input can be modelled.
So everything in a state of flux. There is, however, a possibility to store values to memory, but whereas this is the
normal case in imperative or object oriented environments, this is an exception in the data flow model.
In LabView, there are certain limitations with variables, concerning e.g. the name space and time of assignment.
In addition, some important objects of the original LabView are missing, e.g. arrays or dynamic memory.
Some tasks are thus difficult or even cannot be realized: The original plan was that Johnny 5 explores
its environment and builds a map independently. As a work around the sensor data is now transmitted to
a PC that computes a map for Johnny 5.
In order to reduce the overall program complexity, some functions are modelled as own blocks. Own block can
be compared to subroutines of imperative programs.
Here is the set of Johnny 5 blocks:
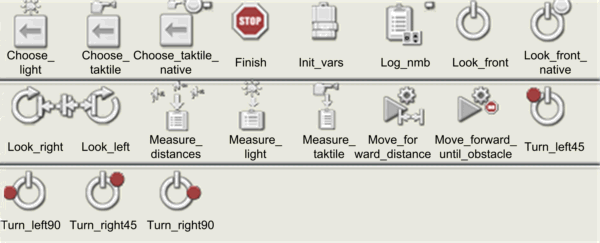
With own block I have to face some additional problem: How to deal with global state information?
As an example: die function Look_right should move the head to 45 degrees (right). If the head
is already on the right position, nothing should happen. The current head state was stored inside a global variable. But how to get the respective value inside an own block? The solution:
- I created a variable in the main program.
- I created the variable with the same name in an own block.
- Same name allocate the same memory, thus it is possible to exchange data between block without a data connection.
However, this approach contains a trap: one can create a block via cut and copy that also copies access code to a certain variable. But if this variable is not explicitly created inside the block, NXT uses another variable, even though names are identical. Neither error nor warning are produced in such a case. Thus:
- create the variable in the main program
- create the variable in the block
- then use the variable in the block.
The ordering is important.
The NXT support site provides smaller blocks that work more efficiently than the original blocks, the so-called mini blocks.
Especially, they do consume conciderably less of the valuable memory in the NXT brick (by the way, I do not have the slightest idea, why the NXT brick has only that few memory space).
Exchanging standard blocks by mini blocks reduced the amount of memory from 11.2 kB to fantastic 6.8 kB in a sample program.
Moreover, the new motor mini blocks are more precisely and provide additional control settings such as
"Control->Motor Power" (magnify motor power in case of resistance).
At this point I want to describe further problems I discovered with the LabView environment.
(Version 1.0 with mini block extension):
- It was not possible to use Bluetooth. The NXT brick could not communicate with any other of my Bluetooth devices.
- The LabView program editor was very unstable and crashed certain times without any understandable reason. Sometimes the problem can be solved by reconstructing entire software blocks.
- One certain own block could not be inserted into a main program without editor crash. I reconstructed the block several times without any success. As a result I copied the entire block contents but that is not the idea of own blocks.
- In the case of programming errors, LabView is not very communicative. Only a general message without
any location information appears, thus looking for the reason is very difficult.
By the way: the most frequent errors are missing data connections as a result of wrong link positions that produces a loose end. In addition, block that are not exactly dropped on a thread line are not executed.
- The editor sometimes produces senseless layouts for branches and loops: either there is much empty space or
blocks are crunched and cannot be edited anymore. Developers have no explicit control over the layout mechanism.
One change compared to the former Mindstorms kit is that
everything is built using Lego technics parts and traditional Lego bricks (those with the knobs) are not used any longer.
NXT robots are mainly constructed using the hole beams. Closed modules cannot constructed with the original kit. There is a certain point, where a constructor yearns for the knob bricks...
Using technics parts as well as knob bricks means to mediate between two worlds. Fortenately, some parts can be used in both worlds: knobs exactly fit into the holes of the beams, axes can be used with all bricks etc.
A model can benefit from both part families. The bottom part of Johnny 5 between the chain tracks could not have been build with only technics parts.
As earlier mentioned, traditional parts were required to model the chains. This, in turn, requires a set of old cogs as the new cogs have different spacings.
The chain track drives were, from the mechanical point of view the Achilles heel of the model.
I tried out two variations:
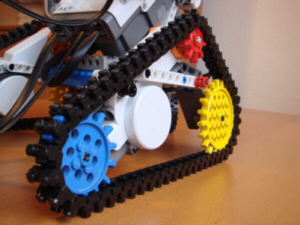 | The first variation of the track chain drive
(without addition cog) |
|
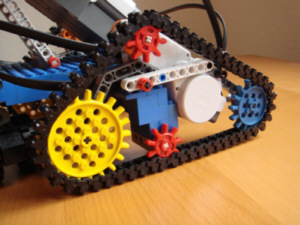 | The second variation of the track chain drive
(final version) |
|
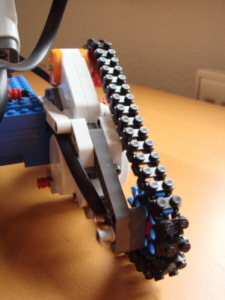 | track chain drive (front view) |
|
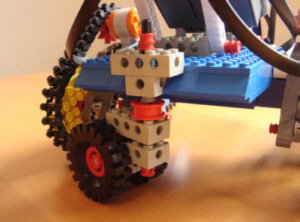 | The rear wheel |
|
The first variation puts a large portion of the chain to ground. If Johnny 5 wants to turn, the chain sticks to the ground
and tries to resist any rotation. The solution was an additional cog that shortens the chain's part that
touches the ground.
An additional mechanism relaxes the chain after turning 45 degrees. It stops the rotation and slightly moves forward and backwards, then continues turning.
For precise movements, the track chain is not the ideal choice. For robots that exactly can measure their movements, drive modules using the tyres are more appropriate.
|
|
 This page
 email
email


